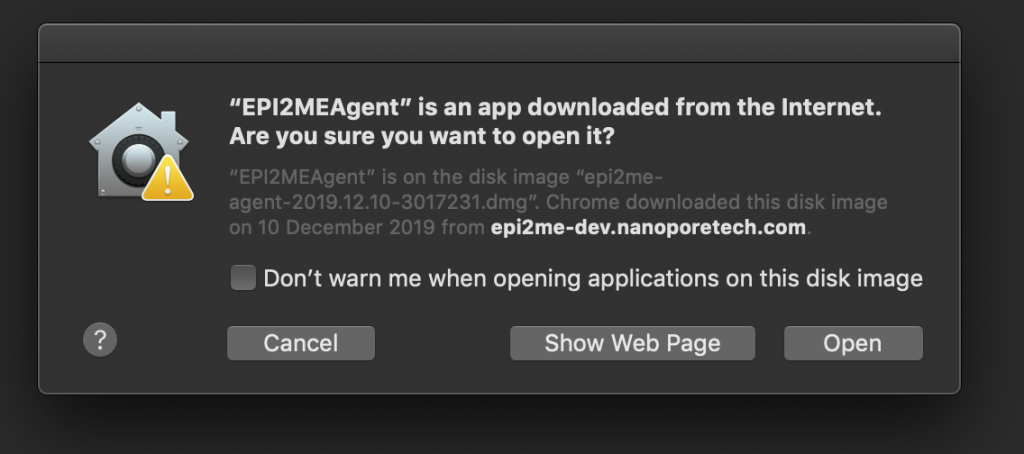
Do you, like me, develop desktop applications for MacOSX? Do you, like me, do it on Linux because it makes for a much cheaper and easier to manage gitlab CI/CD build farm? Do you still sign your apps using a MacOSX machine, or worse (yes, like me), not sign them at all, leaving ugly popups like the one below?
With the impending trustpocalypse next month a lot of third-party (non-app-store) apps for MacOSX are going to start having deeper trust issues than they’ve had previously, no doubt meaning more, uglier popups than that one, or worse, not being able to run at all.
I suspect this trust-tightening issue, whilst arguably a relatively good thing to do to in the war against malware, will adversely affect a huge number of open-source Mac applications where the developer/s wish to provide Mac support for their users but may not wish to pay the annual Apple Developer tax even though it’s still relatively light, or may not even own any Apple hardware (though who knows how they do their integration testing?). In-particular this is likely to affect very many applications built with Electron or NWJS, into which group this post falls.
Well, this week I’ve been looking into this issue for one of the apps I look after, and I’m pleased to say it’s at a stage where I’m comfortable writing something about it. The limitation is that you don’t sidestep paying the Apple Developer tax, as you do still need valid certs with the Apple trust root. But you can sidestep paying for more Apple hardware than you need, i.e. nothing needed in the build farm.
First I should say all of the directions I used came from a 2016 article, here. Thanks very much to Allin Cottrell.
Below is the (slightly-edited) script now forming part of the build pipeline for my app. Hopefully the comments make it fairly self-explanatory. Before you say so, yes I’ve been lazy and haven’t parameterised directory and package names yet.
#!/bin/bash

#########
# This is a nwjs (node) project so fish the version out of package.json
#
VERSION=$(jq -r .version package.json)

#########
# set up the private key for signing, if present
#
rm -f key.pem
if [ "$APPLE_PRIVATE_KEY" != "" ]; then
    echo "$APPLE_PRIVATE_KEY" > key.pem
fi

#########
# temporary build folder/s for package construction
#
rm -rf build
mkdir build && cd build
mkdir -p flat/base.pkg flat/Resources/en.lproj
mkdir -p root/Applications;

#########
# stage the unsigned applicatio into the build folder
#
cp -pR "../dist/EPI2MEAgent/osx64/EPI2MEAgent.app" root/Applications/

#########
# fix a permissions issue which only manifests after following cpio stage
# nw.app seems to be built with owner-read only. no good when packaging as root
#
chmod go+r "root/Applications/EPI2MEAgent.app/Contents/Resources/app.nw"

#########
# pack the application payload
#
( cd root && find . | cpio -o --format odc --owner 0:80 | gzip -c ) > flat/base.pkg/Payload

#########
# calculate a few attributes
#
files=$(find root | wc -l)
bytes=$(du -b -s root | awk '{print $1}')
kbytes=$(( $bytes / 1000 ))

#########
# template the Installer PackageInfo
#
cat <<EOT > flat/base.pkg/PackageInfo
<pkg-info format-version="2" identifier="com.metrichor.agent.base.pkg" version="$VERSION" install-location="/" auth="root">
  <payload installKBytes="$kbytes" numberOfFiles="$files"/>
  <scripts>
    <postinstall file="./postinstall"/>
  </scripts>
  <bundle-version>
    <bundle id="com.metrichor.agent" CFBundleIdentifier="com.nw-builder.epimeagent" path="./Applications/EPI2MEAgent.app" CFBundleVersion="$VERSION"/>
  </bundle-version>
</pkg-info>
EOT

#########
# configure the optional post-install script with a popup dialog
#
mkdir -p scripts
cat <<EOT > scripts/postinstall
#!/bin/bash

osascript -e 'tell app "Finder" to activate'
osascript -e 'tell app "Finder" to display dialog "To get the most of EPI2ME please also explore the Nanopore Community https://community.nanoporetech.com/ ."'
EOT

chmod +x scripts/postinstall

#########
# pack the postinstall payload
#
( cd scripts && find . | cpio -o --format odc --owner 0:80 | gzip -c ) > flat/base.pkg/Scripts
mkbom -u 0 -g 80 root flat/base.pkg/Bom

#########
# Template the flat-package Distribution file together with a MacOS version check
#
cat <<EOT > flat/Distribution
<?xml version="1.0" encoding="utf-8"?>
<installer-script minSpecVersion="1.000000" authoringTool="com.apple.PackageMaker" authoringToolVersion="3.0.3" authoringToolBuild="174">
    <title>EPI2MEAgent $VERSION</title>
    <options customize="never" allow-external-scripts="no"/>
    <domains enable_anywhere="true"/>
    <installation-check script="pm_install_check();"/>
    <script>
function pm_install_check() {
  if(!(system.compareVersions(system.version.ProductVersion,'10.12') >= 0)) {
    my.result.title = 'Failure';
    my.result.message = 'You need at least Mac OS X 10.12 to install EPI2MEAgent.';
    my.result.type = 'Fatal';
    return false;
  }
  return true;
}
    </script>
    <choices-outline>
        <line choice="choice1"/>
    </choices-outline>
    <choice id="choice1" title="base">
        <pkg-ref id="com.metrichor.agent.base.pkg"/>
    </choice>
    <pkg-ref id="com.metrichor.agent.base.pkg" installKBytes="$kbytes" version="$VERSION" auth="Root">#base.pkg</pkg-ref>
</installer-script>
EOT

#########
# pack the Installer
#
( cd flat && xar --compression none -cf "../EPI2MEAgent $VERSION Installer.pkg" * )

#########
# check if we have a key for signing
#
if [ ! -f ../key.pem ]; then
    echo "not signing"
    exit
fi

#########
# calculate attribute
: | openssl dgst -sign ../key.pem -binary | wc -c > siglen.txt

#########
# xar the Installer package
#
xar --sign -f "EPI2MEAgent $VERSION Installer.pkg" \
    --digestinfo-to-sign digestinfo.dat --sig-size $(cat siglen.txt) \
    --cert-loc ../dist/tools/mac/certs/cert00 --cert-loc ../dist/tools/mac/certs/cert01 --cert-loc ../dist/tools/mac/certs/cert02

#########
# construct the signature
#
openssl rsautl -sign -inkey ../key.pem -in digestinfo.dat \
        -out signature.dat

#########
# add the signature to the installer
#
xar --inject-sig signature.dat -f "EPI2MEAgent $VERSION Installer.pkg"

#########
# clean up
#
rm -f signature.dat digestinfo.dat siglen.txt key.pem
With all that you still need a few assets. I built and published (internally) corresponding debs for xar v1.6.1 and bomutils 0.2. You might want to compile & install those from source – they’re pretty straightforward builds.
Next, you need a signing identity. I used XCode (Preferences => Accounts => Apple ID => Manage Certificates) to add a new Mac Installer Distribution certificate. Then used that to sign my .app once on MacOS in order to fish out the Apple cert chain (there are probably better ways to do this)
productsign --sign LJXXXXXX58 \
        build/EPI2MEAgent\ 2020.1.14\ Installer.pkg \
        EPI2MEAgent\ 2020.1.14\ Installer.pkg
Then fish out the certs
xar -f EPI2MEAgent\ 2020.1.14\ Installer.pkg \
        --extract-certs certs
mac:~/agent rmp$ ls -l certs/
total 24
-rw-r--r--  1 rmp  Users  1494 15 Jan 12:06 cert00
-rw-r--r--  1 rmp  Users  1062 15 Jan 12:06 cert01
-rw-r--r--  1 rmp  Users  1215 15 Jan 12:06 cert02
Next use Keychain to export the .p12 private key for the “3rd Party Mac Developer Installer” key. Then openssl it a bit to convert to a pem.
openssl pkcs12 -in certs.p12 -nodes | openssl rsa -out key.pem
I set this up the contents of key.pem as a gitlab CI/CD Environment Variable APPLE_PRIVATE_KEY so it’s never committed to the project source tree.
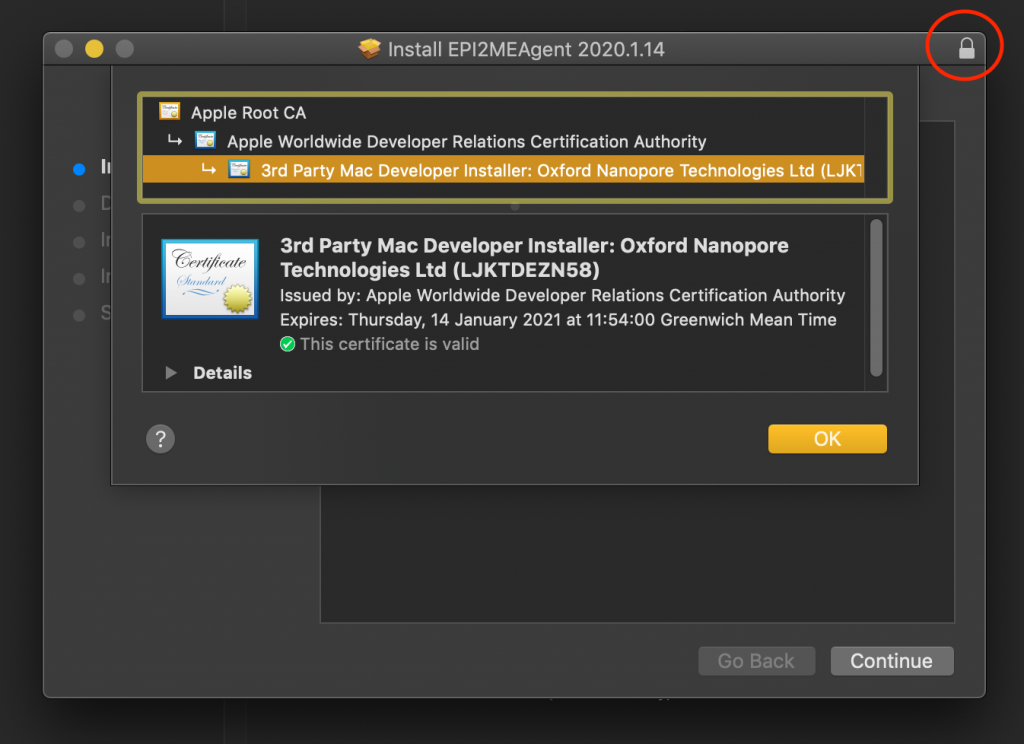
Once all that’s in place it should be possible to run the script (paths-permitting, obviously yours will be different) and end up with an installer looking something like this. Look for the closed padlock in the top-right, and the fully validated chain of certificate trust.
In conclusion, the cross-platform application nwjs builds (Mac, Windows, Linux) all run using nw-builder on ubuntu:18.04, and the Mac (and Windows, using osslsigncode, maybe more on that later) also all run on ubuntu:18.04. Meaning one docker image for the Linux-based Gitlab CI/CD build farm. Nice!