Signing MacOSX apps with Linux

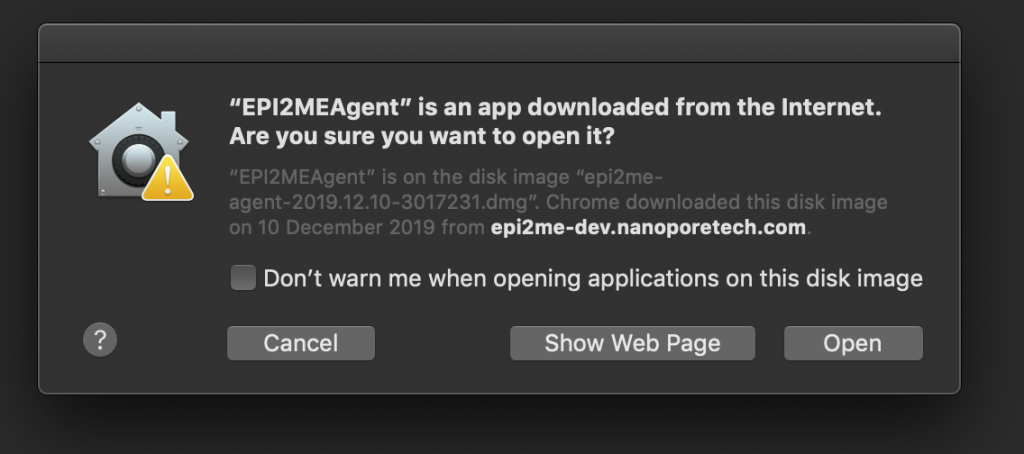
Do you, like me, develop desktop applications for MacOSX? Do you, like me, do it on Linux because it makes for a much cheaper and easier to manage gitlab CI/CD build farm? Do you still sign your apps using a MacOSX machine, or worse (yes, like me), not sign them at all, leaving ugly popups like the one below?

With the impending trustpocalypse next month a lot of third-party (non-app-store) apps for MacOSX are going to start having deeper trust issues than they’ve had previously, no doubt meaning more, uglier popups than that one, or worse, not being able to run at all.

I suspect this trust-tightening issue, whilst arguably a relatively good thing to do to in the war against malware, will adversely affect a huge number of open-source Mac applications where the developer/s wish to provide Mac support for their users but may not wish to pay the annual Apple Developer tax even though it’s still relatively light, or may not even own any Apple hardware (though who knows how they do their integration testing?). In-particular this is likely to affect very many applications built with Electron or NWJS, into which group this post falls.

Well, this week I’ve been looking into this issue for one of the apps I look after, and I’m pleased to say it’s at a stage where I’m comfortable writing something about it. The limitation is that you don’t sidestep paying the Apple Developer tax, as you do still need valid certs with the Apple trust root. But you can sidestep paying for more Apple hardware than you need, i.e. nothing needed in the build farm.

First I should say all of the directions I used came from a 2016 article, here. Thanks very much to Allin Cottrell.

Below is the (slightly-edited) script now forming part of the build pipeline for my app. Hopefully the comments make it fairly self-explanatory. Before you say so, yes I’ve been lazy and haven’t parameterised directory and package names yet.

#!/bin/bash

#########
# This is a nwjs (node) project so fish the version out of package.json
#
VERSION=$(jq -r .version package.json)

#########
# set up the private key for signing, if present
#
rm -f key.pem
if [ "$APPLE_PRIVATE_KEY" != "" ]; then
    echo "$APPLE_PRIVATE_KEY" > key.pem
fi

#########
# temporary build folder/s for package construction
#
rm -rf build
mkdir build && cd build
mkdir -p flat/base.pkg flat/Resources/en.lproj
mkdir -p root/Applications;

#########
# stage the unsigned applicatio into the build folder
#
cp -pR "../dist/EPI2MEAgent/osx64/EPI2MEAgent.app" root/Applications/

#########
# fix a permissions issue which only manifests after following cpio stage
# nw.app seems to be built with owner-read only. no good when packaging as root
#
chmod go+r "root/Applications/EPI2MEAgent.app/Contents/Resources/app.nw"

#########
# pack the application payload
#
( cd root && find . | cpio -o --format odc --owner 0:80 | gzip -c ) > flat/base.pkg/Payload

#########
# calculate a few attributes
#
files=$(find root | wc -l)
bytes=$(du -b -s root | awk '{print $1}')
kbytes=$(( $bytes / 1000 ))

#########
# template the Installer PackageInfo
#
cat <<EOT > flat/base.pkg/PackageInfo
<pkg-info format-version="2" identifier="com.metrichor.agent.base.pkg" version="$VERSION" install-location="/" auth="root">
  <payload installKBytes="$kbytes" numberOfFiles="$files"/>
  <scripts>
    <postinstall file="./postinstall"/>
  </scripts>
  <bundle-version>
    <bundle id="com.metrichor.agent" CFBundleIdentifier="com.nw-builder.epimeagent" path="./Applications/EPI2MEAgent.app" CFBundleVersion="$VERSION"/>
  </bundle-version>
</pkg-info>
EOT

#########
# configure the optional post-install script with a popup dialog
#
mkdir -p scripts
cat <<EOT > scripts/postinstall
#!/bin/bash

osascript -e 'tell app "Finder" to activate'
osascript -e 'tell app "Finder" to display dialog "To get the most of EPI2ME please also explore the Nanopore Community https://community.nanoporetech.com/ ."'
EOT

chmod +x scripts/postinstall

#########
# pack the postinstall payload
#
( cd scripts && find . | cpio -o --format odc --owner 0:80 | gzip -c ) > flat/base.pkg/Scripts
mkbom -u 0 -g 80 root flat/base.pkg/Bom

#########
# Template the flat-package Distribution file together with a MacOS version check
#
cat <<EOT > flat/Distribution
<?xml version="1.0" encoding="utf-8"?>
<installer-script minSpecVersion="1.000000" authoringTool="com.apple.PackageMaker" authoringToolVersion="3.0.3" authoringToolBuild="174">
    <title>EPI2MEAgent $VERSION</title>
    <options customize="never" allow-external-scripts="no"/>
    <domains enable_anywhere="true"/>
    <installation-check script="pm_install_check();"/>
    <script>
function pm_install_check() {
  if(!(system.compareVersions(system.version.ProductVersion,'10.12') >= 0)) {
    my.result.title = 'Failure';
    my.result.message = 'You need at least Mac OS X 10.12 to install EPI2MEAgent.';
    my.result.type = 'Fatal';
    return false;
  }
  return true;
}
    </script>
    <choices-outline>
        <line choice="choice1"/>
    </choices-outline>
    <choice id="choice1" title="base">
        <pkg-ref id="com.metrichor.agent.base.pkg"/>
    </choice>
    <pkg-ref id="com.metrichor.agent.base.pkg" installKBytes="$kbytes" version="$VERSION" auth="Root">#base.pkg</pkg-ref>
</installer-script>
EOT

#########
# pack the Installer
#
( cd flat && xar --compression none -cf "../EPI2MEAgent $VERSION Installer.pkg" * )

#########
# check if we have a key for signing
#
if [ ! -f ../key.pem ]; then
    echo "not signing"
    exit
fi

#########
# calculate attribute
: | openssl dgst -sign ../key.pem -binary | wc -c > siglen.txt

#########
# xar the Installer package
#
xar --sign -f "EPI2MEAgent $VERSION Installer.pkg" \
    --digestinfo-to-sign digestinfo.dat --sig-size $(cat siglen.txt) \
    --cert-loc ../dist/tools/mac/certs/cert00 --cert-loc ../dist/tools/mac/certs/cert01 --cert-loc ../dist/tools/mac/certs/cert02

#########
# construct the signature
#
openssl rsautl -sign -inkey ../key.pem -in digestinfo.dat \
        -out signature.dat

#########
# add the signature to the installer
#
xar --inject-sig signature.dat -f "EPI2MEAgent $VERSION Installer.pkg"

#########
# clean up
#
rm -f signature.dat digestinfo.dat siglen.txt key.pem

With all that you still need a few assets. I built and published (internally) corresponding debs for xar v1.6.1 and bomutils 0.2. You might want to compile & install those from source – they’re pretty straightforward builds.

Next, you need a signing identity. I used XCode (Preferences => Accounts => Apple ID => Manage Certificates) to add a new Mac Installer Distribution certificate. Then used that to sign my .app once on MacOS in order to fish out the Apple cert chain (there are probably better ways to do this)

productsign --sign LJXXXXXX58 \
        build/EPI2MEAgent\ 2020.1.14\ Installer.pkg \
        EPI2MEAgent\ 2020.1.14\ Installer.pkg

Then fish out the certs

xar -f EPI2MEAgent\ 2020.1.14\ Installer.pkg \
        --extract-certs certs
mac:~/agent rmp$ ls -l certs/
total 24
-rw-r--r--  1 rmp  Users  1494 15 Jan 12:06 cert00
-rw-r--r--  1 rmp  Users  1062 15 Jan 12:06 cert01
-rw-r--r--  1 rmp  Users  1215 15 Jan 12:06 cert02

Next use Keychain to export the .p12 private key for the “3rd Party Mac Developer Installer” key. Then openssl it a bit to convert to a pem.

openssl pkcs12 -in certs.p12 -nodes | openssl rsa -out key.pem

I set this up the contents of key.pem as a gitlab CI/CD Environment Variable APPLE_PRIVATE_KEY so it’s never committed to the project source tree.

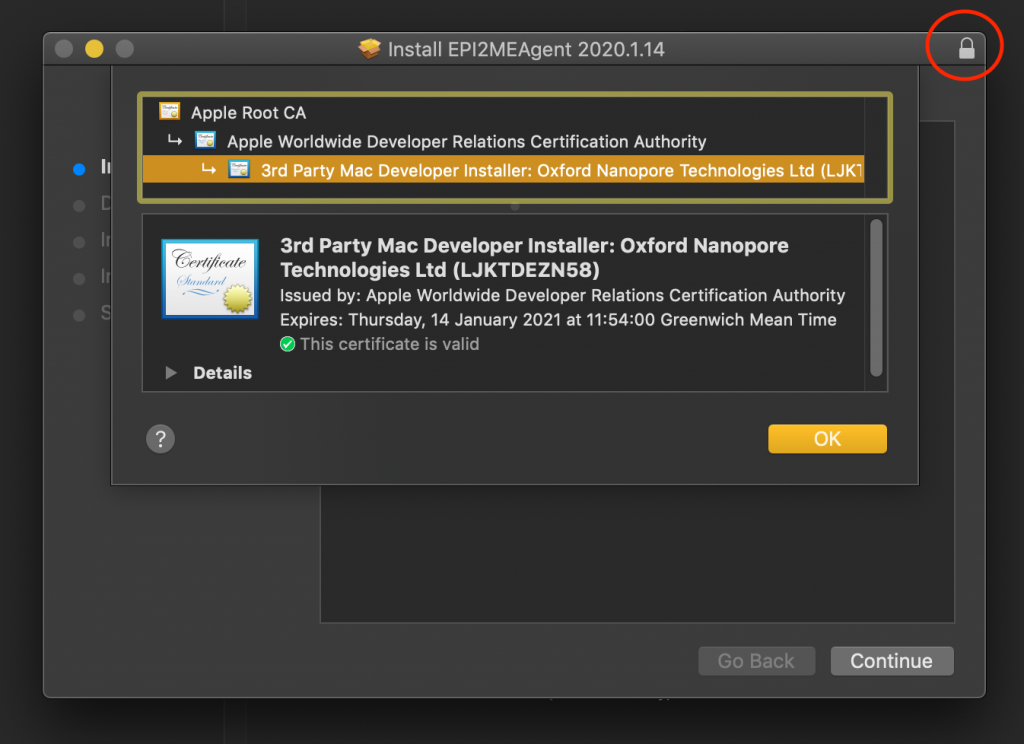
Once all that’s in place it should be possible to run the script (paths-permitting, obviously yours will be different) and end up with an installer looking something like this. Look for the closed padlock in the top-right, and the fully validated chain of certificate trust.

In conclusion, the cross-platform application nwjs builds (Mac, Windows, Linux) all run using nw-builder on ubuntu:18.04, and the Mac (and Windows, using osslsigncode, maybe more on that later) also all run on ubuntu:18.04. Meaning one docker image for the Linux-based Gitlab CI/CD build farm. Nice!

Proxy testing with IP Namespaces and GitLab CI/CD

CC-BY-NC https://www.flickr.com/photos/thomashawk/106559730

At work, I have a CLI tool I’ve been working on. It talks to the web and is used by customers all over the planet, some of them on networks with tighter restrictions than my own. Often those customers have an HTTP proxy of some sort and that means the CLI application needs to negotiate with it differently than it would directly with a web server.

So I need to test it somehow with a proxy environment. Installing a proxy service like Squid doesn’t sound like too big a deal but it needs to run in several configurations, at a very minimum these three:

  • no-proxy
  • authenticating HTTP proxy
  • non-authenticating HTTP proxy

I’m going to ignore HTTPS proxy for now as it’s not actually a common configuration for customers but I reckon it’s possible to do with mkcert or LetsEncrypt without too much work.

There are two other useful pieces of information to cover, firstly I use GitLab-CI to run the CI/CD test stages for the three proxy configurations in parallel. Secondly, and this is important, I must make sure that, once the test Squid proxy service is running, the web requests in the test only pass through the proxy and do not leak out of the GitLab runner. I can do this by using a really neat Linux feature called IP namespaces.

IP namespaces allow me to set up different network environments on the same machine, similar to IP subnets or AWS security groups. Then I can launch specific processes in those namespaces and network access from those processes will be limited by the configuration of the network namespace. That is to say, the Squid proxy can have full access but the test process can only talk to the proxy. Cool, right?

The GitLab CI/CD YAML looks like this (edited to protect the innocent)

stages:
- integration

.integration_common: &integration_common |
apt-get update
apt-get install -y iproute2

.network_ns: &network_ns |
ip netns add $namespace
ip link add v-eth1 type veth peer name v-peer1
ip link set v-peer1 netns $namespace
ip addr add 192.168.254.1/30 dev v-eth1
ip link set v-eth1 up
ip netns exec $namespace ip addr add 192.168.254.2/30 dev v-peer1
ip netns exec $namespace ip link set v-peer1 up
ip netns exec $namespace ip link set lo up
ip netns exec $namespace ip route add default via 192.168.254.1

noproxynoauth-cli:
image: ubuntu:18.04
stage: integration
script:
- *integration_common
- test/end2end/cli

proxyauth-cli:
image: ubuntu:18.04
stage: integration
script:
- *integration_common
- apt-get install -y squid apache2-utils
- mkdir -p /etc/squid3
- htpasswd -cb /etc/squid3/passwords testuser testpass
- *network_ns
- squid3 -f test/end2end/conf/squid.conf.auth && sleep 1 || tail -20 /var/log/syslog | grep squid
- http_proxy=http://testuser:testpass@192.168.254.1:3128/ https_proxy=http://testuser:testpass@192.168.254.1:3128/ ip netns exec $namespace test/end2end/cli
- ip netns del $namespace || true
variables:
namespace: proxyauth

proxynoauth-cli:
image: ubuntu:18.04
stage: integration
script:
- *integration_common
- apt-get install -y squid
- *network_ns
- squid3 -f test/end2end/conf/squid.conf.noauth && sleep 1 || tail -20 /var/log/syslog | grep squid
- http_proxy=http://192.168.254.1:3128/ https_proxy=http://192.168.254.1:3128/ test/end2end/cli
- ip netns del $namespace || true
variables:
namespace: proxynoauth

So there are five blocks here, with three stages and two common script blocks. The first common script block installs iproute2 which gives us the ip command.

The second script block is where the magic happens. It configures a virtual, routed subnet in the parameterised $namespace.

Following that we have the three test stages corresponding to the three proxy (or not) configurations I listed earlier. Two of them install Squid, one of those creates a test user for authenticating with the proxy. They all run the test script, which in this case is test/end2end/cli. When those three configs are modularised and out like this with the common net namespace script as well it provides a good deal of clarity to the test maintainer. I like it a lot.

So then the last remaining things are the respective squid configurations: proxyauth and proxynoauth. There’s a little bit more junk in these than there needs to be as they’re taken from the stock examples, but they look something like this:

 visible_hostname proxynoauth
acl localnet src 10.0.0.0/8 # RFC1918 possible internal network
acl localnet src 172.16.0.0/12 # RFC1918 possible internal network
acl localnet src 192.168.0.0/16 # RFC1918 possible internal network
acl SSL_ports port 443
acl Safe_ports port 80 # http
acl Safe_ports port 443 # https
acl CONNECT method CONNECT
http_access deny !Safe_ports
http_access deny CONNECT !SSL_ports
http_access allow localhost manager
http_access deny manager
http_access allow localnet
http_access allow localhost
http_access deny all
http_port 3128

and for authentication:

 visible_hostname proxyauth
acl localnet src 10.0.0.0/8 # RFC1918 possible internal network
acl localnet src 172.16.0.0/12 # RFC1918 possible internal network
acl localnet src 192.168.0.0/16 # RFC1918 possible internal network
acl SSL_ports port 443
acl Safe_ports port 80 # http
acl Safe_ports port 443 # https
acl CONNECT method CONNECT
http_access deny !Safe_ports
http_access deny CONNECT !SSL_ports
http_access allow localhost manager
http_access deny manager

auth_param basic program /usr/lib/squid3/basic_ncsa_auth /etc/squid3/passwords
auth_param basic realm proxy
acl authenticated proxy_auth REQUIRED

http_access allow authenticated
http_access deny all
http_port 3128

And there you have it – network-restricted proxy testing with different proxy configurations. It’s the first time I’ve used ip net ns without being wrapped up in Docker, LXC, containerd or some other libvirt thing, but the feeling of power from my new-found network-god skills is quite something :)

Be aware that you might need to choose different subnet ranges if your regular LAN conflicts. Please let me know in the comments if you find this useful or if you had to modify things to work in your environment.

Pushing Jenkins Job Build Statuses to Geckoboard

geckoboard

I love using Geckoboard. I love using Jenkins. I do have a few issues connecting the two though.

My Jenkins build cluster sits inside my corporate network and while there is a Jenkins plugin for Geckoboard it will only connect to Jenkins instances it can see on the public internet. I haven’t yet found a Geckoboard plugin for Jenkins to push results out through either. One day soon I’ll be annoyed enough to learn some Java and write one but until then I have a hack.

The core configurations of most of my Jenkins jobs runs approximately on these lines:

make deb && scp *deb deb-repo.my.net:/var/www/apt/incoming/

i.e. build a .deb (for Ubuntu) and if successful, copy and queue it for indexing by reprepro on my .deb repository server.

Now in Geckoboard I can configure a 1×1 Custom Text widget for PUSH data and publish data to it like so:

curl https://push.geckoboard.com/v1/send/F639F1AE-2227-11E4-A773-8FE5A58BF7C4 \
-d "{"api_key":"AC738FE5A58BF7C4","data":{"item":[{"text":"packagename.deb","type":0}]}}"

Let’s make it a little more sustainable. In the main Jenkins configuration I set up a global environment variable called GECKO_APIKEY with a value of AC738FE5A58BF7C4. Now the line reads:

curl https://push.geckoboard.com/v1/send/F639F1AE-2227-11E4-A773-8FE5A58BF7C4 \
-d "{"api_key":"$GECKO_APIKEY","data":{"item":[{"text":"packagename.deb","type":0}]}}"

I know I’ll need to change the posted data on failure which most like means duplicating some or all of that line so I’ll extract the widget id too. The job is now configured like:

export WIDGET=F639F1AE-2227-11E4-A773-8FE5A58BF7C4
make deb && scp *deb deb-repo.my.net:/var/www/apt/incoming/
curl https://push.geckoboard.com/v1/send/$WIDGET \
 -d "{"api_key":"$GECKO_APIKEY","data":{"item":[{"text":"packagename.deb","type":0}]}}"

But it’s not yet triggered differently on success or failure, so…

export WIDGET=F639F1AE-2227-11E4-A773-8FE5A58BF7C4
make deb && scp *deb deb-repo.my.net:/var/www/apt/incoming/  && \
curl https://push.geckoboard.com/v1/send/$WIDGET \
 -d "{"api_key":"$GECKO_APIKEY","data":{"item":[{"text":"packagename.deb","type":0}]}}" || \
curl https://push.geckoboard.com/v1/send/$WIDGET \
 -d "{"api_key":"$GECKO_APIKEY","data":{"item":[{"text":"packagename.deb","type":1}]}}"

The duplicate URL and packagename.deb are annoying aren’t they? A quick look at the Jenkins docs reveals $JOB_NAME has what we want.

export WIDGET=F639F1AE-2227-11E4-A773-8FE5A58BF7C4
export GECKO_URL=https://push.geckoboard.com/v1/send/$WIDGET
make deb && scp *deb deb-repo.my.net:/var/www/apt/incoming/  && \
curl $GECKO_URL \
 -d "{"api_key":"$GECKO_APIKEY","data":{"item":[{"text":"$JOB_NAME PASS","type":0}]}}" || \
curl $GECKO_URL \
 -d "{"api_key":"$GECKO_APIKEY","data":{"item":[{"text":"$JOB_NAME FAIL","type":1}]}}"

Not too bad. It even works on Windows without too many modifications – “set” instead of “export”, %VAR% instead of $VAR and a Windows curl binary added to %PATH%.


Note: All API keys and Widget Ids have been changed to protect the innocent.

Content Delivery Network (CDN) using Linode VPS

This month one of the neat things I’ve done was to set up a small content delivery network (CDN) for speedy downloading of files across the globe. For one reason and another (mostly the difficulty in doing this purely with DNS and the desire not to use AWS), I opted to do this using my favourite VPS provider, Linode. All in all (and give or take DNS propagation time) I reckon it’s possible to deploy a multi-site CDN in under 30 minutes given a bit of practice. Not too shabby!

For this recipe you will need:

  1. Linode account
  2. A domain name and DNS management

What you’ll end up with:

  1. 3x Ubuntu 12.04 LTS VPS, one each in London, Tokyo and California
  2. 3x NodeBalancers, one each in London, Tokyo and California
  3. 1x user-facing general web address
  4. 3x continent-facing web addresses

I’m going to use “mycdn.com” wherever I refer to my DNS / domain. You should substitute your domain name wherever you see it.

So, firstly log in to Linode.

Create three new Linode 1024 small VPSes (or whatever size you think you’ll need). I set mine up as Ubuntu 12.04 LTS with 512MB swap but otherwise nothing special. Set one each to be in London, Tokyo and Fremont. Set the root password on each. Under “Settings”, give each VPS a label. I called mine vps-<city>-01. Under “Remote Settings”, give each a private IP and note them down together with the VPS/data centre they’re in.

At this point it’s also useful (but not strictly necessary) to give each node a DNS CNAME for its external IP address, just so you can log in to them easily by name later.

Boot all three machines and check you can login to them. I find it useful here to do an

apt-get update ; apt-get dist-upgrade.

You can also now install Apache and mod_geoip on each node:

apt-get install apache2 libapache2-mod-geoip
a2enmod include
a2enmod rewrite

You should now be able to bring up a web browser on each VPS (public IP or CNAME) in turn and see the default Apache “It works!” page.

Ok.. still with me? Next we’ll ask Linode to fire up three NodeBalancers, again one in each of the data centres, for each VPS. I labelled mine cdn-lb-<city>-01. Each one can be configured with a Port, 80 with, for now, the default settings. Add a host to each NodeBalancer with the private IP of each VPS, and the port, e.g. 192.168.128.123:80 . Note that each VPS hasn’t yet been configured to listen on those interfaces so each NodeBalancer won’t recognise its host as being up.

Ok. Let’s fix those private interfaces. SSH into each VPS using the root account and the password you set earlier. Edit /etc/network/interfaces and add:

auto eth0:1
iface eth0:1 inet static
	address <VPS private address here>
	netmask <VPS private netmask here>

Note that your private netmask is very unlikely to be 255.255.255.0 (probably) like your home network and yes, this does make a difference. Once that configuration is in, you can:

ifup eth0:1

Now we can add DNS CNAMEs for each NodeBalancer. Take the public IP for each NodeBalancer over to your DNS manager and add a meaningful CNAME for each one. I used continental regions americas, apac, europe, but you might prefer to be more specific than that (e.g. us-west, eu-west, …). Once the DNS propagates you should be able to see each of your Apache “It works!” pages again in your browser, but this time the traffic is running through the NodeBalancer (you might need to wait a few seconds before the NodeBalancer notices the VPS is now up).

Ok so let’s take stock. We have three VPS, each with a NodeBalancer and each running a web server. We could stop here and just present a homepage to each user telling them to manually select their local mirror – and some sites do that, but we can do a bit better.

Earlier we installed libapache2-mod-geoip. This includes a (free) database from MaxMind which maps IP address blocks to the continents they’re allocated to (via the ISP who’s bought them). The Apache module takes the database and sets a series of environment variables for each and every visitor IP. We can use this to have a good guess at roughly where a visitor is and bounce them out to the nearest of our NodeBalancers – magic!

So, let’s poke the Apache configuration a bit. rm /etc/apache2/sites-enabled/000-default. Create a new file /etc/apache2/sites-available/mirror.mycdn.com and give it the following contents:

<VirtualHost>
	ServerName mirror.mycdn.com
	ServerAlias *.mycdn.com
	ServerAdmin webmaster@mycdn.com

	DocumentRoot /mirror/htdocs

	DirectoryIndex index.shtml index.html

	GeoIPEnable     On
	GeoIPScanProxyHeaders     On

	RewriteEngine     On

	RewriteCond %{HTTP_HOST} !americas.mycdn.com
	RewriteCond %{ENV:GEOIP_CONTINENT_CODE} NA|SA
	RewriteRule (.*) http://americas.mycdn.com$1 [R=permanent,L]

	RewriteCond %{HTTP_HOST} !apac.mycdn.com
	RewriteCond %{ENV:GEOIP_CONTINENT_CODE} AS|OC
	RewriteRule (.*) http://apac.mycdn.com$1 [R=permanent,L]

	RewriteCond %{HTTP_HOST} !europe.mycdn.com
	RewriteCond %{ENV:GEOIP_CONTINENT_CODE} EU|AF
	RewriteRule (.*) http://europe.mycdn.com$1 [R=permanent,L]

	<Directory />
		Order deny,allow
		Deny from all
		Options None
	</Directory>

	<Directory /mirror/htdocs>
		Order allow,deny
		Allow from all
		Options IncludesNoExec
	</Directory>
</VirtualHost>

Now ln -s /etc/apache2/sites-available/mirror.mycdn.com /etc/apache2/sites-enabled/ .

mkdir -p /mirror/htdocs to make your new document root and add a file called index.shtml there. The contents should look something like:

<html>
 <body>
  <h1>MyCDN Test Page</h1>
  <h2><!--#echo var="HTTP_HOST" --></h2>
<!--#set var="mirror_eu"       value="http://europe.mycdn.com/" -->
<!--#set var="mirror_apac"     value="http://apac.mycdn.com/" -->
<!--#set var="mirror_americas" value="http://americas.mycdn.com/" -->

<!--#if expr="${GEOIP_CONTINENT_CODE} == AF"-->
 <!--#set var="continent" value="Africa"-->
 <!--#set var="mirror" value="${mirror_eu}"-->

<!--#elif expr="${GEOIP_CONTINENT_CODE} == AS"-->
 <!--#set var="continent" value="Asia"-->
 <!--#set var="mirror" value="${mirror_apac}"-->

<!--#elif expr="${GEOIP_CONTINENT_CODE} == EU"-->
 <!--#set var="continent" value="Europe"-->
 <!--#set var="mirror" value="${mirror_eu}"-->

<!--#elif expr="${GEOIP_CONTINENT_CODE} == NA"-->
 <!--#set var="continent" value="North America"-->
 <!--#set var="mirror" value="${mirror_americas}"-->

<!--#elif expr="${GEOIP_CONTINENT_CODE} == OC"-->
 <!--#set var="continent" value="Oceania"-->
 <!--#set var="mirror" value="${mirror_apac}"-->

<!--#elif expr="${GEOIP_CONTINENT_CODE} == SA"-->
 <!--#set var="continent" value="South America"-->
 <!--#set var="mirror" value="${mirror_americas}"-->
<!--#endif -->
<!--#if expr="${GEOIP_CONTINENT_CODE}"-->
 <p>
  You appear to be in <!--#echo var="continent"-->.
  Your nearest mirror is <a href="<!--#echo var="mirror" -->"><!--#echo var="mirror" --></a>.
 </p>
 <p>
  Or choose from one of the following:
 </p>
<!--#else -->
 <p>
  Please choose your nearest mirror:
 </p>
<!--#endif -->

<ul>
 <li><a href="<!--#echo var="mirror_eu"       -->"><!--#echo var="mirror_eu"        --></a> Europe (London)</a></li>
 <li><a href="<!--#echo var="mirror_apac"     -->"><!--#echo var="mirror_apac"      --></a> Asia/Pacific (Tokyo)</a></li>
 <li><a href="<!--#echo var="mirror_americas" -->"><!--#echo var="mirror_americas"  --></a> USA (Fremont, CA)</a></li>
</ul>

<pre style="color:#ccc;font-size:smaller">
http-x-forwarded-for=<!--#echo var="HTTP_X_FORWARDED_FOR" -->
GEOIP_CONTINENT_CODE=<!--#echo var="GEOIP_CONTINENT_CODE" -->
</pre>
 </body>
</html>

Then apachectl restart to pick up the new virtualhost and visit each one of your NodeBalancer CNAMEs in turn. The ones which aren’t local to you should redirect you out to your nearest server.

Pretty neat! The last step is to add a user-facing A record, I used mirror.mycdn.com, and set it up to DNS-RR (Round-Robin) the addresses of the three NodeBalancers. Now Set up a cron job to rsync your content to the three target VPSes, or a script to push content on-demand. Job done!

For extra points:

  1. Clone another VPS behind each NodeBalancer so that each continent is fault tolerant, meaning you can reboot one VPS in each pair without losing continental service.
  2. Explore whether it’s safe to add the public IP of one Nodebalancer to the Host configuration of a NodeBalancer on another continent, effectively making a resilient loop.

restart a script when a new version is deployed

I have a lot of scripts running in a lot of places, doing various little jobs, mostly shuffling data files around and feeding them into pipelines and suchlike. I also use Jenkins CI to automatically run my tests and build deb packages for Debian/Ubuntu Linux. Unfortunately, being a lazy programmer I haven’t read up about all the great things deb and apt can do so I don’t know how to fire shell commands like “service x reload” or “/etc/init.d/x restart” once a package has been deployed. Kicking a script to pick up changes is quite a common thing to do.

Instead I have a little trick that makes use of the build process changing timestamps on files when it rolls up the package. So when the script wakes up, and starts the next iteration of its event loop, the first thing it does is check the timestamp of itself and if it’s different from the last iteration it executes itself, replacing the running process with a fresh one.

One added gotcha is that if you want to run in taint mode you need to satisfy a bunch of extra requirements such as detainting $ENV{PATH} and all commandline arguments before any re-execing occurs.

#!/usr/local/bin/perl
# -*- mode: cperl; tab-width: 8; indent-tabs-mode: nil; basic-offset: 2 -*-
# vim:ts=8:sw=2:et:sta:sts=2
#########
# Author: rpettett
# Last Modified: $Date$
# Id: $Id$
# $HeadURL$
#
use strict;
use warnings;
use Readonly;
use Carp;
use English qw(-no_match_vars);
our $VERSION = q[1.0];

Readonly::Scalar our $SLEEP_LONG  => 600;
Readonly::Scalar our $SLEEP_SHORT => 30;

$OUTPUT_AUTOFLUSH++;

my @original_argv = @ARGV;

#########

# handle SIGHUP restarts
#
local $SIG{HUP} = sub {
  carp q[caught SIGHUP];
  exec $PROGRAM_NAME, @original_argv;
};

my $last_modtime;

while(1) {
  #########
  # handle software-deployment restarts
  #
  my $modtime = -M $PROGRAM_NAME;

  if($last_modtime && $last_modtime ne $modtime) {
    carp q[re-execing];
    exec $PROGRAM_NAME, @original_argv;
  }
  $last_modtime = $modtime;

  my $did_work_flag;
  eval {
    $did_work_flag = do_stuff();
    1;
  } or do {
    $did_work_flag = 0;
  };

  local $SIG{ALRM} = sub {
    carp q[rudely awoken by SIGALRM];
  };

  my $sleep = $did_work_flag ? $SLEEP_SHORT : $SLEEP_LONG;
  carp qq[sleeping for $sleep];
  sleep $sleep;
}

Systems & Security Tools du jour

I’ve been to two events in the past two weeks which have started me thinking harder about the way we protect and measure our enterprise systems.

The first of the two events was the fourth Splunk Live in St. Paul’s, London last week. I’ve been a big fan of Splunk for a few years but I’ve never really tried it out in production. The second was InfoSec at Earl’s Court. More about that one later.

What is Splunk?

To be honest, splunk is different things to different people. Since inception it’s had great value as a log collation and event alerting tool for systems administrators as that was what it was originally designed to do. However as both DJ Skillman and Godfrey Sullivan pointed out, Splunk has grown into a lot more than that. It solved a lot of “Big Data” (how I hate that phrase) problems before Big Data was trendy, taking arbitrary unstructured data sources structuring them in useful ways, indexing the hell out of them and adding friendly, near-real-time reporting and alerting on top. Nowadays, given the right data sources, Splunk is capable of providing across-the-board Operational Intelligence, yielding tremendous opportunities in measuring value of processes and events.

How does it work?

In order to make the most out of a Splunk installation you require at least three basic things :-

  1. A data source - anything from a basic syslog or Apache web server log to a live high level ERP logistics event feed or even entire code commits
  2. An enrichment process – something to tag packets, essentially to assign value to indexed fields, allowing the association of fields from different feeds, e.g. tallying new orders with a customer database with stock keeping perhaps.
  3. A report – a canned report, presented on a dashboard for your CFO for example, or an email alert to tell your IT manager that someone squirting 5 day experiments in at the head of the analysis pipeline is going to go over-budget on your AWS analysis pipeline in three days’ time.

How far can you go with it?

Well, here’s a few of the pick ‘n’ mix selection of things I’d like to start indexing as soon as we sort out a) the restricted data limits of our so-far-free Splunk installation and b) what’s legal to do

  • Door id access (physical site presence)
  • VPN logins (virtual site presence)
  • Wifi device registrations (guest, internal, whatever)
  • VoIP + PSTN call logs (number, duration)
  • Environmentals – temperature, humidity of labs, offices, server rooms
  • System logs for everything (syslog, authentication, Apache, FTPd, MySQL connections, Samba, the works)
  • SGE job logs with user & project accounting
  • Application logs for anything we’ve written in house
  • Experimental metadata (who ran what when, where, why)
  • Domains for all incoming + outgoing mail, plus mail/attachment weights (useful for spotting outliers exfiltrating data)
  • Firewall: accepted incoming connections
  • Continuous Integration test results (software project, timings, memory, cpu footprints)
  • SVN/Git code commits (yes, it’s possible to log the entire change set)
  • JIRA tickets (who, what, when, project, component, priority)
  • ERP logs (supply chain, logistics, stock control, manufacturing lead times)
  • CRM + online store logs (customer info, helpdesk cases, orders)
  • anything and everything else with vaguely any business value

I think it’s pretty obvious that all this stuff taken together constitutes what most people call Big Data these days. There’s quite a distinction between that sort of mixed relational data and the plainer “lots of data” I deal with day to day, experimental data in the order of a terabyte-plus per device per day.

SVN Server Integration with HTTPS, Active Directory, PAM & Winbind

Subversion on a whiteboard
Image CC by johntrainor
In this post I’d like to explain how it’s possible to integrate SVN (Subversion) source control using WebDAV and HTTPS using Apache and Active Directory to provide authentication and access control.

It’s generally accepted that SVN over WebDAV/HTTPS  provides finer granulation security controls than SVN+SSH. The problem is that SVN+SSH is really easy to set up, requiring knowledge of svnadmin and the filesystem and very little else but WebDAV+HTTPS requires knowledge of Apache and its modules relating to WebDAV, authentication and authorisation which is quite a lot more to ask. Add to that authenticating to AD and you have yourself a lovely string of delicate single point of failure components. Ho-hum, not a huge amount you can do about that but at least the Apache components are pretty robust.

For this article I’m using CentOS but everything should be transferrable to any distribution with a little tweakage.

Repository Creation

Firstly then, pick a disk or volume with plenty of space, we’re using make your repository – same as you would for svn+ssh:

svnadmin create /var/svn/repos

Apache Modules

Install the prerequisite Apache modules:

yum install mod_dav_svn

This should also install mod_authz_svn which we’ll also be making use of. Both should end up in Apache’s module directory, in this case /etc/httpd/modules/

Download and install mod_authnz_external from its Google Code page. This allows Apache basic authentication to hook into an external authentication mechanism. mod_authnz_external.so should end up in Apache’s module directory but in my case it ended up in its default location of /usr/lib/httpd/modules/.

Download and install the companion pwauth utility from its Google Code page. In my case it installs to /usr/local/sbin/pwauth and needs suexec permissions (granted using chmod +s).

Apache Configuration (HTTP)

ServerName svn.example.com
ServerAdmin me@example.com

Listen		*:80
NameVirtualHost *:80

User		nobody
Group		nobody

LoadModule setenvif_module	modules/mod_setenvif.so
LoadModule mime_module		modules/mod_mime.so
LoadModule log_config_module	modules/mod_log_config.so
LoadModule dav_module		modules/mod_dav.so
LoadModule dav_svn_module	modules/mod_dav_svn.so
LoadModule auth_basic_module    modules/mod_auth_basic.so
LoadModule authz_svn_module	modules/mod_authz_svn.so
LoadModule authnz_external_module modules/mod_authnz_external.so

LogFormat	"%v %A:%p %h %l %u %{%Y-%m-%d %H:%M:%S}t "%r" %>s %b "%{Referer}i" "%{User-Agent}i"" clean
CustomLog	/var/log/httpd/access_log	clean

<virtualhost *:80>
	ServerName	svn.example.com

	AddExternalAuth         pwauth  /usr/local/sbin/pwauth
	SetExternalAuthMethod   pwauth  pipe

	<location / >
		DAV			svn
		SVNPath			/var/svn/repos
		AuthType		Basic
		AuthName		"SVN Repository"
		AuthzSVNAccessFile	/etc/httpd/conf/authz_svn.acl
		AuthBasicProvider	external
		AuthExternal		pwauth
		Satisfy			Any

		<limitexcept GET PROPFIND OPTIONS REPORT>
			Require valid-user
		</limitexcept>
	</location>
</virtualhost>

Network Time (NTP)

In order to join a Windows domain, accurate and synchronised time is crucial, so you’ll need to be running NTPd.

yum install ntp
chkconfig ntpd on
ntpdate ntp.ubuntu.com
service ntpd start

Samba Configuration

Here’s where AD comes in and in my experience this is by far the most unreliable service. Install and configure samba:

yum install samba
chkconfig winbind on

Edit your /etc/samba/smb.conf to pull information from AD.

[global]
	workgroup = EXAMPLE
	realm = EXAMPLE.COM
	security = ADS
	allow trusted domains = No
	use kerberos keytab = Yes
	log level = 3
	log file = /var/log/samba/%m
	max log size = 50
	printcap name = cups
	idmap backend = idmap_rid:EXAMPLE=600-20000
	idmap uid = 600-20000
	idmap gid = 600-20000
	template shell = /bin/bash
	winbind enum users = Yes
	winbind enum groups = Yes
	winbind use default domain = Yes
	winbind offline logon = yes

Join the machine to the domain – you’ll need an account with domain admin credentials to do this:

net ads join -U administrator

Check the join is behaving ok:

[root@svn conf]# net ads info
LDAP server: 192.168.100.10
LDAP server name: ad00.example.com
Realm: EXAMPLE.COM
Bind Path: dc=EXAMPLE,dc=COM
LDAP port: 389
Server time: Tue, 15 May 2012 22:44:34 BST
KDC server: 192.168.100.10
Server time offset: 130

(Re)start winbind to pick up the new configuration:

service winbind restart

PAM & nsswitch.conf

PAM needs to know where to pull its information from, so we tell it about the new winbind service in /etc/pam.d/system-auth.

#%PAM-1.0
# This file is auto-generated.
# User changes will be destroyed the next time authconfig is run.
auth        required      pam_env.so
auth        sufficient    pam_unix.so nullok try_first_pass
auth        requisite     pam_succeed_if.so uid >= 500 quiet
auth        sufficient    pam_winbind.so try_first_pass
auth        required      pam_deny.so

account     required      pam_unix.so broken_shadow
account     sufficient    pam_localuser.so
account     sufficient    pam_succeed_if.so uid < 500 quiet
account     [default=bad success=ok user_unknown=ignore] pam_winbind.so
account     required      pam_permit.so

password    requisite     pam_cracklib.so try_first_pass retry=3
password    sufficient    pam_unix.so md5 shadow nullok try_first_pass use_authtok
password    sufficient    pam_winbind.so use_authtok
password    required      pam_deny.so

session     optional      pam_keyinit.so revoke
session     required      pam_limits.so
session     [success=1 default=ignore] pam_succeed_if.so service in crond quiet use_uid
session     required      /lib/security/pam_mkhomedir.so 
session     required      pam_unix.so
session     optional      pam_winbind.so

YMMV with PAM. It can take quite a lot of fiddling around to make it work perfectly. This obviously has an extremely close correlation to how flaky users find the authentication service. If you’re running on 64-bit you may find you need to install 64-bit versions of pam modules, e.g. mkhomedir which aren’t installed by default.

We also modify nsswitch.conf to tell other, non-pam aspects of the system where to pull information from:

passwd:     files winbind
shadow:     files winbind
group:      files winbind

To check the authentication information is coming back correctly you can use wbinfo but I like seeing data by using getent group or getent passwd. The output of these two commands will contain domain accounts if things are working correctly and only local system accounts otherwise.

External Authentication

We’re actually going to use system accounts for authentication. To stop people continuing to use svn+ssh (and thus bypassing the authorisation controls) we edit /etc/ssh/sshd_config and use AllowUsers or AllowGroups and specify all permitted users. Using AllowGroups will also provide AD group control of permitted logins but as the list is small it’s probably overkill. My sshd_config list looks a lot like this:

AllowUsers	root rmp contractor itadmin

To test external authentication run /usr/local/sbin/pwauth as below. “yay” should be displayed if things are working ok. Note the password here is displayed in clear-text:

[root@svn conf]# pwauth && echo 'yay' || echo 'nay'
rmp
mypassword

Access Controls

/etc/httpd/authz_svn.conf is the only part which should require any modifications over time – the access controls specify who is allowed to read and/or write to each svn project, in fact as everything’s a URL now you can arbitrarily restrict subfolders of projects too but that’s a little OTT. It can be arbitrarily extended and can take local and active directory usernames. I’m sure mod_authz_svn has full documentation about what you can and can’t put in here.

#
# Allow anonymous read access to everything by default.
#
[/]
* = r
rmp = rw

[/myproject]
rmp = rw
bob = rw

...

SSL

So far that’s all the basic components. The last piece in the puzzle is enabling SSL for Apache. I use the following /etc/httpd/httpd.conf:

ServerName svn.example.com
ServerAdmin me@example.com

Listen		*:80
NameVirtualHost *:80

User		nobody
Group		nobody

LoadModule setenvif_module	modules/mod_setenvif.so
LoadModule mime_module		modules/mod_mime.so
LoadModule log_config_module	modules/mod_log_config.so
LoadModule proxy_module		modules/mod_proxy.so
LoadModule proxy_http_module	modules/mod_proxy_http.so
LoadModule rewrite_module	modules/mod_rewrite.so
LoadModule dav_module		modules/mod_dav.so
LoadModule dav_svn_module	modules/mod_dav_svn.so
LoadModule auth_basic_module    modules/mod_auth_basic.so
LoadModule authz_svn_module	modules/mod_authz_svn.so
LoadModule ssl_module		modules/mod_ssl.so
LoadModule authnz_external_module modules/mod_authnz_external.so

Include conf.d/ssl.conf

LogFormat	"%v %A:%p %h %l %u %{%Y-%m-%d %H:%M:%S}t "%r" %>s %b "%{Referer}i" "%{User-Agent}i"" clean
CustomLog	/var/log/httpd/access_log	clean

<virtualhost *:80>
	ServerName		svn.example.com

	Rewrite		/	https://svn.example.com/	[R=permanent,L]
</virtualhost>

<virtualhost *:443>
	ServerName	svn.example.com

	AddExternalAuth         pwauth  /usr/local/sbin/pwauth
	SetExternalAuthMethod   pwauth  pipe

	SSLEngine on
	SSLProtocol all -SSLv2

	SSLCipherSuite		ALL:!ADH:!EXPORT:!SSLv2:RC4+RSA:+HIGH:+MEDIUM:+LOW
	SSLCertificateFile	/etc/httpd/conf/svn.crt
	SSLCertificateKeyFile	/etc/httpd/conf/svn.key

	<location />
		DAV			svn
		SVNPath			/var/svn/repos
		AuthType		Basic
		AuthName		"SVN Repository"
		AuthzSVNAccessFile	/etc/httpd/conf/authz_svn.acl
		AuthBasicProvider	external
		AuthExternal		pwauth
		Satisfy			Any

		<limitexcept GET PROPFIND OPTIONS REPORT>
			Require valid-user
		</limitexcept>
	
</virtualhost>

/etc/httpd/conf.d/ssl.conf is pretty much the unmodified distribution ssl.conf and looks like this:

LoadModule ssl_module modules/mod_ssl.so

Listen 443

AddType application/x-x509-ca-cert .crt
AddType application/x-pkcs7-crl    .crl

SSLPassPhraseDialog  builtin

SSLSessionCache         shmcb:/var/cache/mod_ssl/scache(512000)
SSLSessionCacheTimeout  300

SSLMutex default

SSLRandomSeed startup file:/dev/urandom  256
SSLRandomSeed connect builtin

SSLCryptoDevice builtin

SetEnvIf User-Agent ".*MSIE.*" \
         nokeepalive ssl-unclean-shutdown \
         downgrade-1.0 force-response-1.0

You’ll need to build yourself a certificate, self-signed if necessary, but that’s a whole other post. I recommend searching the web for “openssl self signed certificate” and you should find what you need. The above httpd.conf references the key and certificate under /etc/httpd/conf/svn.key and /etc/httpd/conf/svn.crt respectively.

The mod_authnz_external+pwauth combination can be avoided if you can persuade mod_authz_ldap to play nicely. There are a few different ldap modules around on the intertubes and after a lot of trial and even more error I couldn’t make any of them work reliably if at all.

And if all this leaves you feeling pretty nauseous it’s quite natural. To remedy this, go use git instead.

A Simple Continuous Integration (Jenkins) Dashboard

I had 15 minutes today to produce a wall-mounted-screen-compatible dashboard for showing the latest build statuses from our Jenkins continuous integration manager. It’s written in Perl and uses a few CPAN modules – XML::Simple, LWP::Simple and Readonly.

This is what it looks like:

and here’s the code:

#!/usr/local/bin/perl -T
use strict;
use warnings;
use XML::Simple;
use LWP::Simple qw(get);
use Carp;
use English qw(-no_match_vars);
use Readonly;

Readonly::Scalar our $CI      => q[http://my.ci.server/rssLatest];
Readonly::Scalar our $COLUMNS => 6;

my $str     = get($CI);
my $xml     = XMLin($str);
my @entries = map { $xml->{entry}->{$_} } sort keys %{$xml->{entry}};

print <<"EOT" or croak qq[Error printing: $ERRNO];
Content-type: text/html

<html>
 <head>
  <title>Continuous Integration HUD</title>
  <meta http-equiv="refresh" content="120; url=$ENV{SCRIPT_NAME}"/>
  <style type="text/css">
.stable { background-color: green }
.unstable { background-color: yellow }
.broken { background-color: red }
table { margin: 0 auto; }
a { font-size: bigger; text-decoration: none; color: black; }
  </style>
  <script src="http://ajax.googleapis.com/ajax/libs/jquery/1.6.4/jquery.min.js"></script>
  <script type="text/javascript">
\$(document).ready(redraw);
\$(window).resize(redraw);

function redraw() {
   \$('tr').height((\$(window).height()-60)/\$('tr').size());
   \$('td').width((\$(window).width()-60)/\$('tr').first().find('td').size());
}
  </script>
 </head>
 <body>
EOT

print qq[<table>\n] or croak qq[Error printing: $ERRNO];
while(scalar @entries) {
  print qq[ <tr>\n] or croak qq[Error printing: $ERRNO];
  for my $j (1..$COLUMNS) {
    my $entry = shift @entries;
    if(!$entry) {
      last;
    }

    my $title = $entry->{title};
    my $class = q[stable];
    $class    = ($title =~ /unstable/smx) ? 'unstable' : $class;
    $class    = ($title =~ /broken/smx)   ? 'broken'   : $class;
    $title    =~ s{\s+[(].*?$}{}smx;

    my $href = $entry->{link}->{href};
    print qq[  <td class="$class"><a href="$href">$title</a></td>] or croak qq[Error printing: $ERRNO];
  }
  print qq[ </tr>\n] or croak qq[Error printing: $ERRNO];
}
print qq[</table>\n] or croak qq[Error printing: $ERRNO];

print <<'EOT' or croak qq[Error printing: $ERRNO];
 </body>
</html>
EOT

Automated basic Xen snapshots

With a little bit of shell-scripting I made this. It runs on a dom0 and scans through virtual machines running on a cluster, requesting snapshots of each one. You may want to use vm-snapshot-with-quiesce if it’s supported by xen-tools on your domU machines.

for i in `xe vm-list params=name-label | grep name | awk '{print $NF}' | xargs echo`; do echo $i; xe vm-snapshot vm=$i new-name-label="$i-`date +'%Y-%m-%dT%H:%M:%S'`"; done

If you cron the above script every day then after a few days you may want to start deleting the oldest snapshots:

for i in `xe vm-list params=name-label | grep name | awk '{print $NF}'`; do snapshot=`xe vm-list name-label=$i params=snapshots | awk '{print $NF}'`; echo "$i earliest snapshot is $snapshot"; if [ "$snapshot" ]; then xe vm-uninstall vm=$snapshot force=true; fi; done

Technostalgia

BBC Micro

Ahhhhh, Technostalgia. This evening I pulled out a box from the attic. It contained an instance of the first computer I ever used. A trusty BBC B+ Micro and a whole pile of mods to go with it. What a fabulous piece of kit. Robust workhorse, Econet local-area-networking built-in (but no modem, how forward-thinking!), and a plethora of expansion ports. My admiration of this hardware is difficult to quantify but I wasted years of my life learning how to hack about with it, both hardware and software.

The BBC Micro taught me in- and out- of the classroom. My primary school had one in each classroom and, though those might have been the ‘A’ or ‘B’ models, I distinctly remember one BBC Master somewhere in the school. Those weren’t networked but I remember spraining a thumb in the fourth year of primary school and being off sports for a few weeks. That’s when things really started happening. I taught myself procedural programming using LOGO. I was 10 – a late starter compared to some. I remember one open-day the school borrowed (or dusted off) a turtle

BBC Buggy (Turtle)

Brilliant fun, drawing ridiculous spirograph-style patterns on vast sheets of paper.

When I moved up to secondary school my eyes were opened properly. The computer lab was pretty good too. Networked computers. Fancy that! A network printer and a network fileserver the size of a… not sure what to compare it with – it was a pretty unique form-factor – about a metre long, 3/4 metre wide and about 20cm deep from memory (but I was small back then). Weighed a tonne. A couple of 10- or 20MB Winchesters in it from what I recall. I still have the master key for it somewhere! My school was in Cambridge and had a couple of part-time IT teacher/administrators who seemed to be on loan from SJ Research. Our school was very lucky in that regard – we were used as a test-bed for a bunch of network things from SJ Research, as far as I know a relative of Acorn. Fantastic kit only occasionally let down by the single, core network cable slung overhead between two buildings.

My first experience of Email was using the BBC. We had an internal mail system *POST which was retired after a while, roughly when ARBS left the school I think. I wrote my own MTA back then too, but in BASIC – I must have been about 15 at the time. For internet mail the school had signed up to use something called Interspan which I later realised must have been some sort of bridge to Fidonet or similar.

Teletext Adapter

We even had a networked teletext server which, when working, downloaded teletext pages to the LAN and was able to serve them to anyone who requested them. The OWUKWW – One-way-UK-wide-web! The Music department had a Music 5000 Synth which ran a language called Ample. Goodness knows how many times we played Axel-F on that. Software/computer-programmable keyboard synth – amazing.

Around the same time I started coding in 6502 and wrote some blisteringly fast conversions of simple games I’d earlier written in BASIC. I used to spend days drawing out custom characters on 8×8 squared exercise books. I probably still have them somewhere, in another box in the attic.

6502 coprocessor

Up until this point I’d been without a computer at home. My parents invested in our first home computer. The Atari ST. GEM was quite a leap from the BBC but I’d seen similar things using (I think) the additional co-processors – either the Z80- or the 6502 co-pro allowed you to run a sort of GEM desktop on the Beeb.

My memory is a bit hazy because then the school started throwing out the BBCs and bringing in the first Acorn Archimedes machines. Things of beauty! White, elegant, fast, hot, with a (still!) underappreciated operating system, high colour graphics, decent built-in audio and all sorts of other goodies. We had a Meteosat receiver hooked up to one in the geography department, pulling down WEFAX transmissions. I *still* haven’t got around to doing that at home, and I *still* want to!

Acorn A3000 Publicity Photo

Atari STE Turbo Pack

The ST failed pretty quickly and was replaced under warranty with an STE. Oh the horror – it was already incompatible with several games, but it had a Blitter chip ready to compete with those bloody Amiga zealots. Oh Babylon 5 was rendered on an Amiga. Sure, sure. But how many thousands of hit records had been written using Cubase or Steinberg on the Atari? MIDI – there was a thing. Most people now know MIDI as those annoying, never-quite-sounding-right music files which autoplay, unwarranted, on web pages where you can’t find the ‘mute’ button. Even that view is pretty dated.

Back then MIDI was a revolution. You could even network more than one Atari using it, as well as all your instruments of course. The STE was gradually treated to its fair share of upgrades – 4MB ram and a 100MB (SCSI, I think) hard disk, a “StereoBlaster” cartridge even gave it DSP capabilities for sampling. Awesome. I’m surprised it didn’t burn out from all the games my brothers and I played. I do remember wrecking *many* joysticks.

Like so many others I learned more assembler, 68000 this time, as I’d done with the BBC, by typing out pages and pages of code from books and magazines, spending weeks trying to find the bugs I’d introduced, checking and re-checking code until deciding the book had typos, but GFA Basic was our workhorse. My father had also started programming in GFA, and still did do until about 10 years ago when the Atari was retired.

Then University. First term, first few weeks of first term. I blew my entire student grant, £1400 back then, on my first PC. Pentium 75, 8MB RAM, a 1GB disk and, very important back then, a CD-ROM drive. A Multimedia PC!
It came with Windows 3.11 for Workgroups but with about 6 weeks of work was dual boot with my first Linux install. Slackware.

That one process, installing Slackware Linux with only one book “Que: Introduction to UNIX” probably taught me more about the practicalities of modern operating systems than my entire 3-year BSc in Computer Science (though to be fair, almost no theory of course). I remember shuttling hundreds of floppy disks between my room in halls and the department and/or university computer centre. I also remember the roughly 5% corruption rate and having to figure out the differences between my lack of understanding and buggered files. To be perfectly honest things haven’t changed a huge amount since then. It’s still a daily battle between understanding and buggered files. At least packaging has improved (apt; rpm remains a backwards step but that’s another story) but basically everything’s grown faster. At least these days the urge to stencil-spray-paint my PC case is weaker.

So – how many computers have helped me learn my trade? Well since about 1992 there have been five of significant import. The BBC Micro; the Acorn Archimedes A3000; the Atari ST(E); the Pentium 75 and my first Apple Mac G4 powerbook. And I salute all of them. If only computers today were designed and built with such love and craft. *sniff*.

Required Viewing:

  • Micro Men
  • The Pirates of Silicon Valley